Tower/Mythological


Illustrations by Alison Baker Rasmussen


More Drawlloween work; my forlorn cobwebby bride turns up a lot in my gothic junk journaling. She’ll probably do a respectful runner – like in Anne with an E.


This is Ku. He is the flashy vampire from my writing and comes up a lot in my gothic junk journalling.
This Winter Witch is Linnet; a witch I write about and draw (broken eyeball permitting) – so I’ve added her to my gothic junk journal for Drawlloween.


2 Glampire
Vampire Ku is that gaudy vampire of mine and has always been a flashy fellow. I’m learning the ways of digital art using procreate and I cannot explain how long this took to make, but no paper has been wasted! Digital is very tree friendly!
1 Spooky Self Portrait

This was originally drawn in pencil for last year’s Monster Me. I plan to redraw more of my past drawings for this year as I’m learning digital art using procreate and I want to take some of my older drawings a little further. I hope to do as many as I can. It’s been a crazy time for me lately and I really need to de-stress a little, so hopefully Drawlloween will be as fun as ever and I can learn some new techniques.
I’ve also just started a master’s degree in Creative Writing which means I haven’t had the time to write any stories or poems for my Drawlloweens this year, which is a shame as that was such a highlight for me last year! If I find a minute, I will try! I offer zero promises. 😀 I really am excited to be trying some new things. I hope it will help ease some of the anxiety and depression I have accumulated over these past few dreary years.
Oh, so long ago a lovely collection of seeding dandelions were collected and collated into a collage. The perfect store for my Seed Fairy’s fashion inspirations. She wears fluffing dandelions in her hair, a pretty petalled gown and dusty moth wings. She is ready for the fairy ball. Or so you’d like to think. But no, she is the worlds biggest trickster as she loves to hide out of sight and have seeds rain down on any unsuspecting fairy she takes a shine to.
You’ll meet that fairy next time.
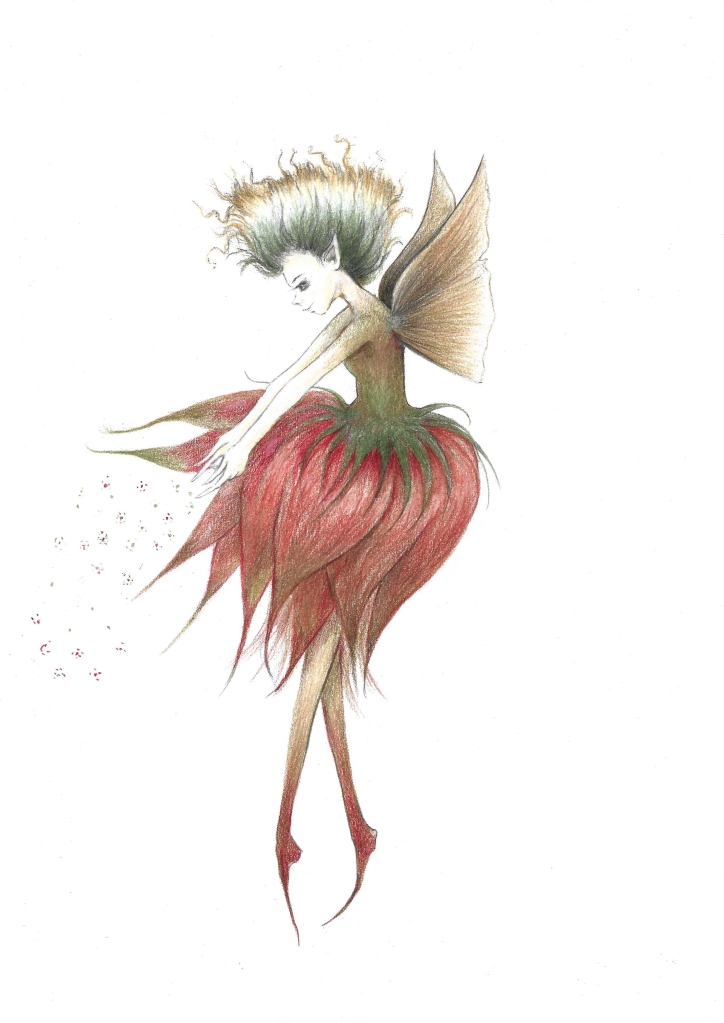
I drew her using aged flowers that had been collected and displayed in a picture frame. The dried fluff on a dandelion is perfect and I began with graphite with the idea that I would finish with coloured pencil. I love to draw in graphite, but I know colour would enhance a lovely fairy, so I decided to make my graphite work as an under drawing and then I can add colour later. Grey scale underpaintings are a useful step towards your finished piece as you can solve quite a lot of problems at an early stage. I always find this part relaxing. I think giving yourself freedom to make mistakes is very important to enjoying the process – art shouldn’t be stressful. I find painting stressful as I’m not a painter and this is my answer. And once the graphite drawing is ready, I plan to scan a slightly paler version of it and print it on the same good quality paper so I can then continue safely adding colour to the drawing. Colour pencil directly over graphite is not a good idea – it looks dirty and you can ruin quite a lot of effort that way.
Going back to the initial graphite I used a few mark making techniques that I find work quite well with graphite pencils. You can get them reliably sharp and work at different angles and pressure to get some interesting effects.
The frothy hair was made with twists and flicks, the smooth skin was made by transferring graphite from the pencil via the paper to the tornichon – I find this so much smoother than lines – especially for such a small face.
As I refined the sketch, I noticed that the proportions needed a little attention, her neck was a little too big and her jaw too manly, so I slimmed that down and sharpened her jaw – something I would have struggled with had I dived straight in with coloured pencil. I continued this way until I was satisfied that she was believable. This particular fairy is based on human anatomy and so I used a selection of references that helped me check that she was correct. I find manga and anime art is very helpful with this sort of project because it is very dynamic.
I continued working on her skirt – which is an inverted flower, and I made plump petals to give it a bell shape. I gave it movement by pushing them forward to show she was flying, and they were interreacting with her lower body. Her legs were loosely based on flower stems.
Since I have other plans, there is no point trying to finish this as a very detailed graphite drawing, so I scanned it, and printed it on to the same paper I used for the first stage. I added some pale layers of browns and reds and greens. Too many colours are likely to spoil the drawing and I like to use Autumnal colours for this type of creature so I am keeping it simple. I think a mix of different browns can look so lovely, and I’m pretty sure this is why I get so much inspiration from Froud and Rackham as their work features these colours a lot. I like working with muted tones. They seem more delicate to me. More subtle. They are not as simple as they look, but it’s nice that they give that impression.
There is still a lot of work to do at this stage. Make no mistake, it is not colouring in. The graphite is an underpainting and I’ll probably be here a while!
I’m using subdued colours for this fairy. Medium terracotta, Lincoln green, and a mix of browns. Understanding the colours will be helpful. Greens and reds are complimentary colours so tend to make each other appear brighter if they are next to each other. You can also use a red to mute a green – or vice versa – if your colour looks too bright. Mixing them creates different browns depending on the type of red and green you choose. I think this can make colours marry nicely as your parent colours will work without too much trouble with the brown you made them with.
I think making imaginary creatures believable should come from things that work and are recognisable in the real world. Believable anatomy will make you think the creature could exist, or make you hope it exists, at least. I have tried making creatures up just from my head and they are never as believable as they are when I have done some forward planning. Even borrowing tiny snippets from something real can really add to your own freaky freak. I don’t think that approach is due to a terrible lack of imagination (at least I hope not), they are useful to help you make real the thing you already thought of.


A few years ago, I was participating in the Twitter Collective Animaloonies (a very silly art challenge to inflate creatures) and one month it was the turn of the elephant – an elephantloon. I always hesitated at just inflating them into balloons and often chose other whimsical ways to play. So, I went the way of the chimera, combining a jerboa with an elephant and insect wings. This work was ultimately used in a Twitter Art Exhibition (TAE) charity auction and seemed to be well liked, too!
My creation has since evolved and is now based on the body of a jerboa, an anteater’s snout, and a hummingbird moth wings.
I call it the humming pig. I named it before I discovered the hummingbird moth so I feel this is some sort of destiny, and that makes me happy. I like moths. I know some people don’t but since they are the cool and darker cousins of the butterfly, I’ll take it.
As you can see, my humming pigs are based on a number of real animals to help make it believable despite them not being real at all. I’ll just put it out there. All of them were fun to draw and explore, but Jerboas are ridiculously adorable. Those things are so cute it’s heart-breaking. I drooled over and drew many examples preparing this. Just for practice, you understand.


Sketching out the real animals helps us to learn more about them – such as their form and proportions, and the correct positioning of the limbs and wings. It also serves as a practice run for the animal they will eventually become. You can try out different angles and figure out what your imaginary creature is doing, and how it functions in the world it inhabits.
I looked at lots of different examples of each animal and considered how they would work together to make something believable. Some things were simply abandoned. Not just because they wouldn’t work, but because they just didn’t appeal to me. The anteater snout replaced the original elephant trunk, but it isn’t that prominent – and to be honest this is maybe a sign that the elements are blending successfully as I make something new. The original proboscis wasn’t there in my first attempts either, but I think the proboscis is important for my redesign since I eliminated the elephant trunk, the kids got to eat after all, and I wanted to make something that might actually survive.
My humming pigs will continue to evolve, and I look forward to continuing my project. I’ll be trying different animals as a way to take my humming pigs forward and expand their natural history. I plan to keep exploring and testing new ideas so I can build a world for them. I want to explore geographical considerations which would inspire distant cousins – humming pigs from different places, evolving in different climates and with different diets, all influencing the final creature.
There is a huge line of animals just waiting to be transformed!
It’s worth mentioning that looking at other artists is always helpful. I like to collect art books and I have a couple of really nice ones about imaginary creatures. So, here’s some recommendations:
Principles of Creature Design – Creating Imaginary Animals by Terryl Whitlatch, 2015, Design Studio Press
Mythical Beasts – An Artists Field Guide to Designing Fantasy Creatures, 2017, 3dtotal Publishing
Sketching from the Imagination – Creatures and Monster, 2019, 3dtotal Publishing
There’s an animal anatomy section in a magazine which is still available:
The Creative Masterclass Anatomy Essentials ImagineFX, Future Publishing.
TAE and Twitter:
https://www.twitterartexhibit.org/
Animaloon Collective (@Animaloonies) / Twitter
Links about me:
https://folksy.com/shops/PaynesGreyArtShop
https://www.etsy.com/uk/shop/PaynesGreyArtShop
